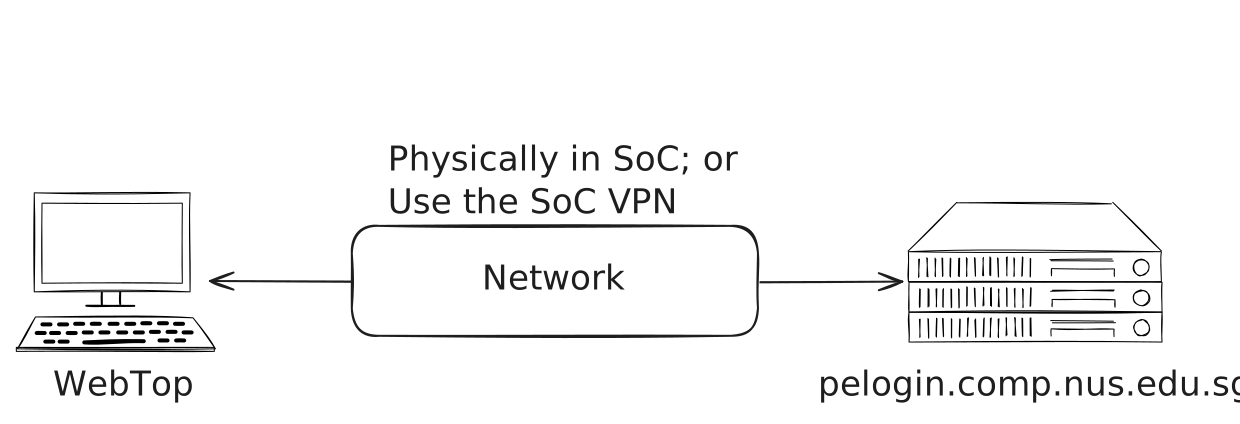
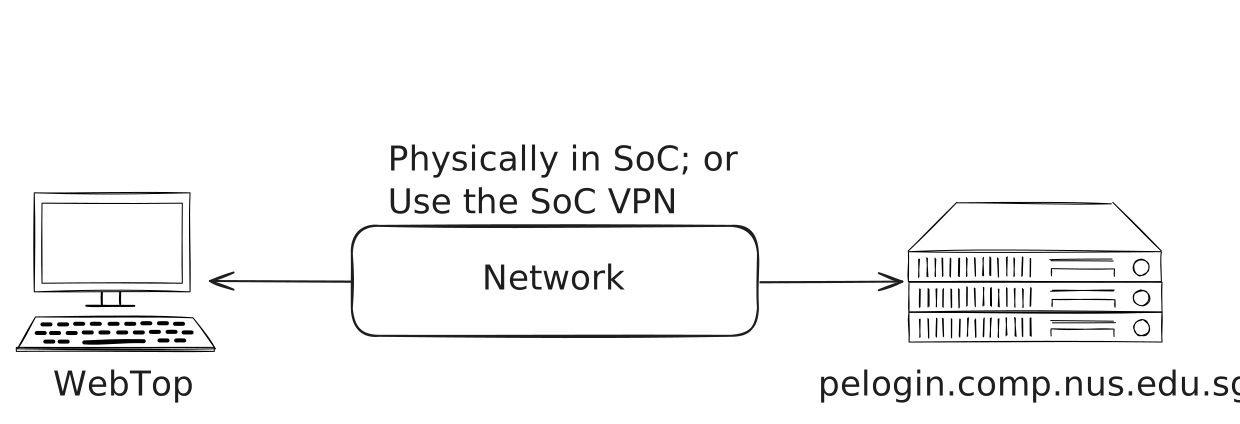
When you connect to a remote machine (that is, physically in another location from your current machine), you typically will only have access to a terminal.
You will not have access to a Graphical User Interface (GUI), like a desktop environment or web browser.
This is because remote machines are often used for running many users’ programs, and do not have the resources to run a full GUI.
In this minimal environment, you often still have to be productive, and this tutorial will share some tools that you may find useful.
PE Setup
During the actual PE, you will be required to connect to a remote machine to do the exam in a secure environment.
You will connect from a machine in the programming labs to the remote PE machine.
For this tutorial, your Tut 3 environment includes a practice version of NUS pelogin.
It lets you practise the same SSH and command-line workflow without actually connecting to a different machine.
Practice environment
For security reasons, pelogin in Tut 3 is a simulation and does not connect to another machine or the NUS pelogin service.
During the actual PE, we will pass you your real username and password.
Don’t worry if you don’t yet know how to connect to or interact with the remote PE machine.
We will explore some ways to do this in the subsequent sections.
Are You There? (ping)
A lot of times, we would assume that the remote machine is reachable.
However, this is not always the case.
It might be because you forgot to connect to the VPN, or you’re not in SoC (honestly the physical boundaries are unclear).
Before we start to point fingers, let’s always verify that the remote machine is reachable.
Ping is a tool that is used to check whether a machine in the network is reachable.
It’s like throwing a stone into a dark cave and listening for the echo.
It’s also a sanity check to ensure that you are in the correct network.
Let’s try to ping pelogin to verify that the practice environment is ready.
Run the following:
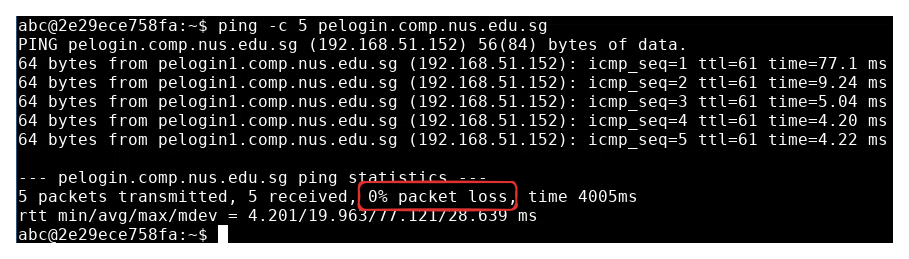
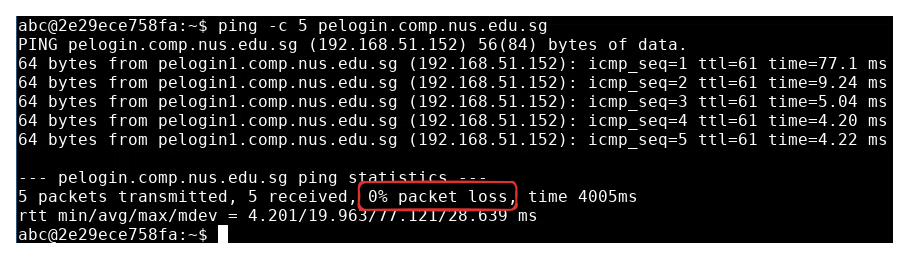
ping -c 5 pelogin
You should see an output similar to the following. Make sure that it says “0% packet loss” at the bottom.
Ever wondered how ping got its name?
If ping returns successfully, we can at least be sure that the remote machine we’re trying to connect to is ‘reachable’ from our local machine.
Remote Connection (ssh)
Secure SHell (SSH) is a way to connect remotely to machines.
This is important as you will be using SSH to connect to the training environment now and to the remote PE machine during your practical exam.
The syntax is as follows (replace <user> and <ipaddress or hostname> with the intended values):
ssh <user>@<ipaddress or hostname>
Let’s connect to the pelogin practice environment.
Display the credentials generated for this Tut 3 launch:
cat ~/tutorial/pelogin-credentials.txt
Run the login command shown in that file. It will look like:
ssh plabXXXX@pelogin
Replace plabXXXX with the generated username.
Only for the first connection, you will see a message that begins with “The authenticity of host”. Type yes, followed by Enter
When prompted for a password, enter the password shown in that file (password). Nothing will appear on screen as you type, not even asterisks. This is normal, so just type it and press Enter
You should see that your prompt has changed, which means you are successfully connected
Run some commands, such as ls or pwd, to verify that it is working
Congrats, your terminal is now connected to the pelogin practice environment!
Exploring Your New Environment
Let’s explore this new environment a bit.
Run whoami. It should print your generated plabXXXX username
Run pwd. It should print /home/plabXXXX
Run echo "$HOME". It should print the same directory as pwd
Disconnecting From the Remote Machine
To leave a remote machine, you can either run the command exit, or press the key combination Ctrl+D.
Let’s practise leaving and coming back, since you will do both during the PE.
Disconnect from pelogin by running exit, or by pressing Ctrl+D
Check that your prompt shows the Tut 3 environment user abc again
Reconnect using the same login command as before
Seeing What’s Different (diff)
Ensure that you are connected to pelogin for this exercise.
John is doing the problem located at ~/primes, and he couldn’t tell what’s wrong.
The make test output looks the same on both sides and he can’t see the difference.
Go into the directory: cd ~/primes
Test the program with make test
The command make test cuts off if the line is too long,
so does not always provide sufficient information about the test case.
In order to solve John’s problem, we will be looking at two concepts,
the diff command, and how to do redirection.
The diff command compares two files and reports the lines that differ.
That makes it the tool for checking what your program actually printed against what it was supposed to print,
which is a job you do not want to do by eye.
Ensure that you are connected to pelogin for this exercise.
Back in your home folder are three files named d1.txt, d2.txt, and d3.txt.
Run the following commands to see the differences between them:
| connects two programs, sending the output of the first into the second.
- tells diff to read that output instead of a file.
Copying Files (scp)
scp (secure copy) copies files between machines over the same SSH connection you used earlier.
Its syntax mirrors cp: the source comes first and the destination second,
except that a path on another machine is written as user@host:path.
Run this exercise on WebTop, after exiting pelogin.
John has just finished his PE, and wants to export his code to flex on his friends.
He copies a single file off the remote machine onto his own.
Please don't do this
John’s story does not end well for John.
Copying your work off the PE machine is not something you can or should do during the exam.
This is just an exercise to use scp.
Copy run.c across (replacing plabXXXX with your username):
scp plabXXXX@pelogin:~/primes/run.c .
Enter the same password as before. Nothing will appear on screen as you type
Run ls to confirm the file arrived
Terminal Multiplexer (tmux) (Extra)
This section shows how you can use the program tmux to have multiple windows (tabs..?) in a single terminal session.
It might help your productivity (e.g., one window to edit your code, another one to compile and view the output?).
It also makes you look very cool.
Tip
(Extra) There are countless arguments against needing a terminal multiplexer like tmux. However, you should still learn it, then decide for yourself if you want to use it.
”Just Open Another Tab”
At first glance, it might seem like tmux is just a way to open another tab in the terminal.
While that is true, it is not the only thing that tmux does.
Tmux shines when you need to work with remote systems.
Firstly, on remote systems, using a new terminal tab is more cumbersome than using tmux.
To have a new tab, you have to open a new terminal tab, and then connect via SSH in that new tab.
Additionally, each tab is a new SSH connection.
With tmux, all the tabs share the same SSH connection.
Secondly, tmux sessions persist even after the terminal is closed, or if the network disconnects.
Sessions, Windows, and Panes
The concepts in tmux might differ slightly from what you expect.
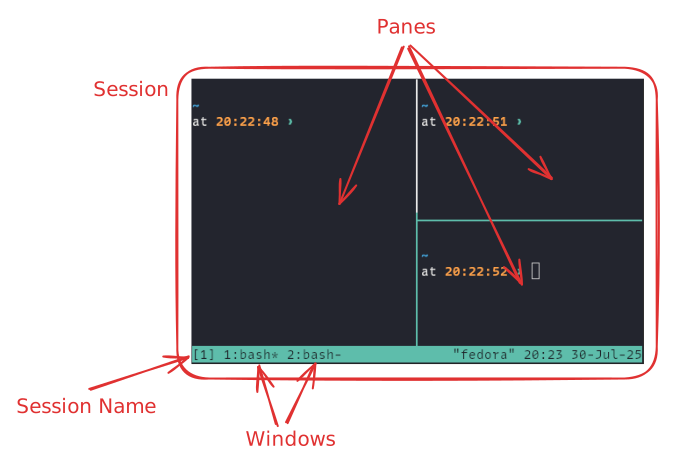
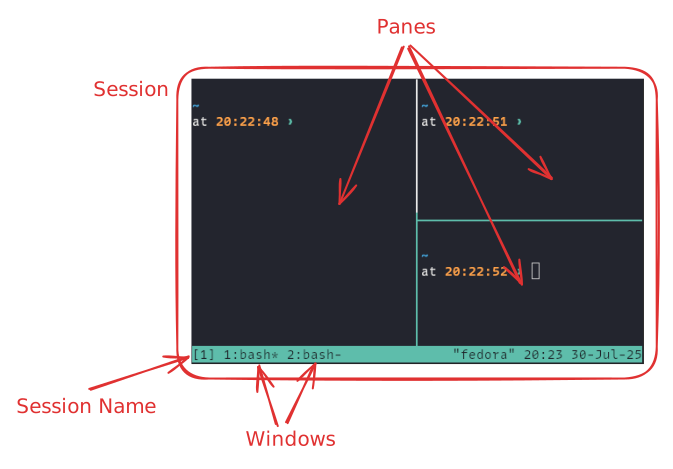
What most people call “tabs” are called “windows” in tmux.
In tmux, a session is made up of windows, and each window can be split into multiple panes.
You can refer to the figure below for a visual representation.
Tmux uses chording, which means you don’t have to press all the keys at the same time.
For example, to create a new window, you will press Ctrl-B, let go, then press c.
Thanks to this chording model, tmux keybindings will rarely (if ever) conflict with other programs, because all of them begin with a special prefix: Ctrl-B.
In tmux, this Ctrl-B key is known as the prefix key
Command
Description
Mnemonic
prefix c
Create a new window
create
prefix d
Detach from the current session
detach
prefix n
Switch to the next window
next
prefix p
Switch to the previous window
previous
prefix x
Close the current pane
exit
prefix z
Zoom the current pane
zoom
prefix %
Split window vertically
prefix "
Split window horizontally
prefix arrow_keys
Jump to pane in that direction
Tip
Similar to Vim, the commands would stick better in your head if you give it a mnemonic.
Do this exercise on WebTop, after exiting pelogin.
Try out the commands in the table, in tmux. Just a few things to note:
To open tmux, type tmux on the terminal, followed by Enter
If you use prefix z to zoom the current pane, you can press prefix z to un-zoom
We’ll explore prefix d in the subsequent chapter
Find out the keybindings to do the following:
Rename session
Rename window
Switch to window by number
Switch to pane by number
Picking Up Where You Left Off
Note
Do not rely on tmux sessions surviving a disconnect during the actual PE.
Frequently save your work.
Here’s one advantage of using tmux: it will remember where you left off.
If you have detached from a session earlier. You can reattach with:
and you will pick up exactly where you left off, as though you didn’t leave.
To check what sessions are still alive:
tmux list-sessions
We’ll do this exercise on WebTop.
Ensure that you are in WebTop, and not connected to pelogin. (Your prompt should show “abc@webtop”)
Open tmux, and run some command (e.g. ls)
Simulate a “disconnection” by closing the terminal window
Open a new terminal window (by refreshing the window, or using some other method)
List all sessions, you should notice your session is still alive: tmux ls
Attach to the session: tmux a
You should be exactly where you left off
(Extra) If you want to try the prefix d keybinding, you can do the following: Repeat the all the previous steps, but in step 3, instead of closing the terminal window, detach from the session by pressing the prefix key followed by d.
Configuration
Out of the box, tmux comes with questionable defaults.
You can tweak its behaviour by editing ~/.tmux.conf (you may have to create ~/.tmux.conf if it does not exist).
Tip
During PE, you probably don’t want to spend too much configuring your environment. Limit the amount of customisations you do on tmux. Some configurations are already applied in /etc/tmux.conf
Warning
It is non-trivial to update tmux with the new configuration. Following these steps should ensure that the new configuration is applied.
Ensure that there are no more active tmux sessions: tmux ls
Kill any session that are still active: tmux kill-session -t <name>
Start tmux: tmux
You should be in a tmux session with the most updated configuration
Prefix key
Due to the poor location of the default prefix key (Ctrl-B) on a QWERTY keyboard, many people choose to remap it.
Some common alternatives are Ctrl-Space or Ctrl-A.
The following code snippet, in your tmux configuration, will fix the issue.
set -s escape-time 0
O is slow to open a line above.
Terminals send <Esc>O as the prefix for arrow and function keys,
so Vim waits to see whether your O is the start of a key code rather than the command.
Setting a short key code timeout in your .vimrc ends the wait,
and leaves the longer timeout for your own mappings untouched.
set ttimeoutset ttimeoutlen=10
Using vimdiff Instead of diff (Extra)
If you replace diff with vimdiff (or vim -d), you can view the diff in Vim:
./run < test/test_cases/1.in > actual.txt && vimdiff test/test_cases/1.out actual.txt./run < test/test_cases/1.in > actual.txt && vim -d test/test_cases/1.out actual.txt # Alternative
Tip
If you choose to use Vim to view diffs, you may also want to read more about folds in Vim. See :h fold-commands
Graded Task(s)
Bob has set up an SSH server to share a file with you.
Since he set up the infrastructure by vibes
(well obviously because he still thinks it’s tut 1),
he has no idea what the file is named,
or where the SSH server lives.
He thinks it’s one of these:
Your SSH username is your GitHub username in lowercase,
and the password is in ~/password.txt.
For instance, if your username is Bob and the host is tut04.cs1010.org
ssh bob@tut04.cs1010.org
If you forgot how to do this,
you may want to relook at this section.
Ping each hostname to find out which machine is reachable
Copy the file from the machine into your local machine
You might want to SSH to find out the file path
Run verify <filename> to ensure that you have the right file
Before you leave: verify your progress
Run this command inside your Tutorial environment:
progress
It shows whether you have successfully completed the tutorial and which
individual tasks have been recorded as complete.
The progress command is available only inside a Tutorial environment, not in
the general CS1010 WebTop environment.