Starting in this volume, you will practise abstraction by implementing code inside functions.
For most exercises, you only need to edit student.c and fill in the functions provided.
Much of the input handling, output, and testing code has been abstracted away into other files.
You do not need to understand all of that code yet, but you are free to read those files if you are curious.
To read our expectations for code in this course (which we will teach you over time), read C Standards
0. KG to LB Converter
Focus
Floating-point arithmetic and converting between kilograms and pounds.
Introduction
Have you ever had to convert between kilograms and pounds? (Eldon follows a sport where he has to convert between kilograms and pounds often, thanks to the USA.) Well, today, you’ll get a chance to build one! In keeping with the idea of abstraction, we’ll not have you worry about how the program is going to look like, or how to handle input, we’ve done that for you.
Your Task
All you have to do is help us finish the core logic of the program.
Only edit student.c.
It contains two functions for you to complete:
kg_to_lb takes a value in kilograms and returns the equivalent value in pounds
lb_to_kg takes a value in pounds and returns the equivalent value in kilograms
Assume that 1 kilogram is 2.2 pounds.
Note
You are not writing your code in main for this exercise, as explained above.
The supplied converter.c, student.h, and test files provide the rest of the program.
You only need to fill in the two functions in student.c.
Running
To compile, run make
To run, run ./converter
Woah, what just appeared?
Some of our exercises have graphical user interfaces (GUIs) to make things more interesting. You don’t need to care about how we built it, but it’s just another way to interact with programs. If you want to find out (totally outside the scope of this course), feel free to read the non-student.c files.
To test, run make test
The converter lets you enter a value and select a conversion.
Input validation is handled for you.
Adding Test Cases
To add your own test case, create matching .in and .out files in test/test_cases.
The input file should contain the function name followed by the input value on the next line.
For example, an input file for converting 5 kilograms to pounds contains:
kg_to_lb5
The matching output file contains:
11.00000
Note
Test outputs show five digits after the decimal point for floating-point values.
1. Celsius to Fahrenheit Converter
Focus
Floating-point arithmetic and applying temperature-conversion formulas.
Introduction
Have you ever had to convert between Celsius and Fahrenheit when looking up recipes, or the weather? Maybe used one off a website? Well, today, you’ll get a chance to build one! In keeping with the idea of abstraction, we’ll not have you worry about how the program is going to look like, or how to handle input, we’ve done that for you.
Your Task
All you have to do is help us finish the core logic of the program.
Only edit student.c.
It contains two functions for you to complete:
c_to_f takes a temperature in Celsius and returns the equivalent temperature in Fahrenheit
f_to_c takes a temperature in Fahrenheit and returns the equivalent temperature in Celsius
Use the following relationship between Celsius (C) and Fahrenheit (F):
C=95(F−32)
Note
You are not writing your code in main for this exercise.
The supplied converter.c, student.h, and test files provide the rest of the program.
You only need to fill in the two functions in student.c.
Running
To compile, run make
To run, run ./converter
To test, run make test
The converter lets you enter a value and select a conversion.
Input validation is handled for you.
Adding Test Cases
To add your own test case, create matching .in and .out files in test/test_cases.
The input file should contain the function name followed by the input value on the next line.
For example, an input file for converting 2.14 degrees Celsius to Fahrenheit contains:
c_to_f2.14
The matching output file contains:
35.85200
Note
Test outputs show five digits after the decimal point for floating-point values.
2. Vowels
Focus
Boolean connectives and character classification.
Introduction
There are 5 vowels (we’re going to ignore ‘Y’) in the English alphabet. In particular, there is ‘A’, ‘E’, ‘I’, ‘O’, and ‘U’.
Your Task
Only edit student.c and complete this function:
bool is_vowel(char c);
Return true if c is an uppercase or lowercase vowel, and false otherwise.
We may give either upper- or lowercase letters, or even non-alphabetical (but definitely ASCII) characters as input.
Note
The supplied vowels.c reads input and prints the result.
You only need to implement is_vowel in student.c, but you are free to read the other files.
Running
To compile, run make
To run, run ./vowels
To test, run make test
3. Leap
Focus
Divisibility tests and compound boolean conditions.
Introduction
We’re sure you’ve heard that every 4 years is a leap year. But did you know that the year 1900 is not a leap year? In fact, years like 1800, or 1700 are not considered leap years. On the other hand, a year like 1600 is considered a leap year. What gives? It turns out the rules for which years are leap years are a little more involved than we thought. It goes something like this:
Note
“Every year that is exactly divisible by four is a leap year, except for years that are exactly divisible by 100, but these centurial years are leap years if they are exactly divisible by 400.”
Your Task
Only edit student.c and complete this function:
bool is_leap(int year);
Return true when year is a leap year and false otherwise.
The supplied driver will print Is a leap year or Is not a leap year based on your return value.
Hint
If you haven’t already figured out how to test for divisibility, recall that the modulo operator % in C gets the remainder. That is, if we ran a % b, the result of the expression is the remainder of a divided by b. If b divides a, what is the remainder?
Note
The supplied leap.c handles input and output.
You only need to implement is_leap in student.c, but you are free to read the other files.
Running
To compile, run make
To run, run ./leap
To test, run make test
4. Quadratic
Focus
Arithmetic, the math library, and branching over quadratic roots.
Introduction
We’re going to use this exercise to show you a few small things that are good to know (that you should remember). In particular:
We’ll expand on the concept of header files and libraries
Make use of one such library, in particular the math library (via math.h)
Get some more practice implementing a few basic arithmetic operations and if-else statements
Delve a little more into relational operators for the special case of floating-point values
Quadratic Solving
Hopefully you’ve seen this formula before in secondary school (was it?) where you’re given a formula like so:
ax2+bx+c
and were asked when does this formula equal 0?
For example, in the special case of x2−6x+8, we know that when x=4 or when x=2, the aforementioned formula evaluates to 0.
The real values x for which the formula is equal to 0 are called the real roots of the polynomial (for convenience we’re just going to refer to them as roots). For a quadratic polynomial, there are 3 possible cases:
It has no roots
It has one root
It has two roots
To figure out which case we are in, we use the following formula: b2−4ac. The aforementioned quantity is also called the discriminant. If the discriminant is >0, then the formula has 2 distinct roots. If the discriminant is 0, then there is only one root. If the discriminant is <0, then there are no roots (no real ones, at least).
Then, to figure out what the roots are, we use the following formula:
2a−b±b2−4ac
Note here that ± means that you have to either add b2−4ac to −b or subtract it instead.
Your Task
We’ve written some boilerplate code for you that you can safely ignore for now, although you’re free to read it. You’ll understand what it’s doing later in the semester.
Only edit student.c.
It contains two functions for you to complete:
double discriminant(double a, double b, double c);void print_roots(double a, double b, double c);
discriminant should return:
b2−4ac
print_roots should behave as follows:
If there are no real roots, print No roots followed by a newline
If there is one real root, print −b/(2a) followed by a newline
If there are two real roots, print the root computed using subtraction first,
followed by the root computed using addition on the next line
If you’re printing any floating-point values, please do so with five digits after the decimal point (i.e. use %.5f in your printf).
The sqrt and fabs operations from math.h are available.
Floating-Point Tolerance
Floating-point calculations can produce a value that is very close to zero without being exactly zero.
For this exercise, first handle every negative discriminant as having no real roots.
Then treat a non-negative discriminant as zero when fabs(disc) < 1e-5.
A discriminant greater than or equal to 1e-5 has two distinct roots.
Warning
The sqrt function is only guaranteed to work for non-negative values.
Check that the discriminant is non-negative before passing it to sqrt.
Do not call sqrt on a negative discriminant to decide whether there are real roots.
Note
The supplied quadratic.c reads the three coefficients and calls print_roots.
You only need to fill in the two functions in student.c, but you are free to read the other files.
Running
To compile, run make
To run, run ./quadratic
To test, run make test
Enter a, b, and c on separate lines when running the program.
Adding Test Cases
To add a direct function test, create matching .in and .out files in test/test_cases.
The input file should contain the function name followed by a, b, and c on separate lines.
For example:
discriminant1-68
The matching output file contains:
4.00000
Use print_roots as the function name when you want to test the printed root behavior.
5. Taxi
Focus
Conditionals, arithmetic, and implementing a taxi fare calculator.
Introduction
We’re going to use this exercise to give you some practice with if/else statements (and to work out a little details about integer division).
Computing Taxi Fares
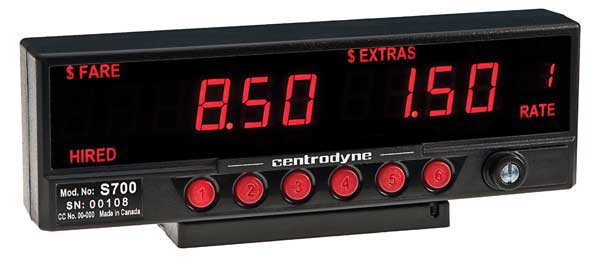
If you’ve been in a taxi before, you might have seen a device akin to the following:
How does it figure out how much to charge you? If we use ComfortDelgro as an example, assuming we’re getting a Toyota Prius, the prices are computed in the following way:
If the trip distance is up to 1km or less, then the fare is 4.60SGD
Every 400m thereafter or less (after 1km) up until 10km will incur an additional cost of 0.26SGD
Every 350m thereafter or less (after 10km) will incur an additional cost of 0.26SGD
In this exercise we’re going to pretend you’re tasked with writing the part of the driver code for this device that figures out the fare (some other engineer has figured out how to display it, and another engineer has figured out how to obtain the distances from the car already).
Your Task
Only edit student.c and complete this function:
int calculate_fare(int meters);
Return the total fare in cents. The supplied taxi.c reads the trip distance, calls your function, and prints the fare in dollars.cents form. You should not read input or print output in student.c.
Expected Behaviour
Your function should return the fare in cents. The supplied program formats this value as dollars.cents, where cents is a value between 0 and 99 (inclusive), and ends the output with a newline character.
The fare computation is given based on the rules given in the previous section.
If we input any value 0 up to 1000, the program should print 4.60.
Other values for example, if we input something like 1001, since this is the first meter after 1000m, we should start charging them 26 more cents, and so the program should output 4.86. Similarly, for any distance from 1001 up to 1400, the answer should also be 4.86.
This also means that at the distance 1401 meters, the answer should be 5.12. Since we travelled 1000m (for which we were charged 4.60), then travelled 400m (for which we were charged 26 cents), then travelled another 1m (for which we were charged another 26 cents).
As another example, if we travelled exactly 10000m (or 10km), then the fare should be 10.58 (and thus the program should output 10.58). To see this, we were charged 4.60 for the first kilometer. After that, the remaining 9000 meters is basically 22×400+200 meters. In other words, we travelled 400m a total of 22 times, before travelling 200m. So we are charged 26 cents a total of 22+1 times. The total works out to be 10.58.
So what about 10001m up to 10350m? The fare should be 10.84 because after travelling 10km, the next 350m should incur a cost of 10.58+0.26=10.84. This also means that a distance like 10351m will incur a cost of 10.58+0.26+0.26 since we travelled 350m beyond 10000m, then another 1m after that.
Some Things to Note
This is a relatively simple looking task that might actually cause some of you sleepless nights to figure out what exactly the formula should be. Here are some points to think about:
Should we be using the double type to represent our fare here? We want to output something that has a decimal point, but can you foresee any issues with using floating point? If we don’t want to use floating point, can you think of a better, if slightly unintuitive, way to represent the fare?
Figuring out the exact formula for figuring how many multiples of 0.26 dollars to add to the fare might be a little tricky. Perhaps work out a few examples on paper (bearing in mind the kind of arithmetic you might be doing)
Running
To compile: run make
To run the complete program: run ./taxi
To test calculate_fare directly: run make test
To add a test case, create matching .in and .out files in test/test_cases. The input file should contain the distance in meters:
1001
The output file should contain the expected return value in cents:
486
The complete ./taxi program formats that return value as 4.86.
6. Pong
Okay, let’s have some fun (In the words of Eldon: “Fun”). We’re going to implement Pong. In this last task, we’ll talk about the different concepts you’ll need to know. We’ll mostly be getting you guys to implement the physics/logic after we’ve explained it.
Note
There’s a slight amount of awkwardness if you’re doing this in the year 2026 because of how the lectures were shifted later by a week. So we’ve worked around that and added some stuff, though it’s clunky.
It’s not exactly great practice, but just bear with us for this one. :)
Background
We’re basically playing ping pong in this game, where you control a “bar” and there is an enemy AI that also controls a bar.
Basically, if the ball makes it past our bar (which can only move left or right), then the enemy wins a point. If the ball makes it past the enemy’s bar (which also can only move left or right), then we win a point. The first to reach 5 points wins the whole game.
You can watch this video to see what classic Pong looks like (though we’ve flipped it, the paddles in the video can only move up/down).
We also won’t be recreating the exact aesthetic with a GUI (it’s a lot of effort and I banged this out in half a day - Eldon, 2026), so we’ll have a very clunky UI to go along with it. We’ve done up the TUI for you, so really all you have to do is the physics. (If any of you want to build a nice GUI for us, let us know :) I’m all for it. Personally, I can’t GUI to save my own life.)
Running and Playing
From the 6-pong directory:
Run make to compile the game
Run ./pong to play
Use the left and right arrow keys to move your paddle
Press q to quit
Adjust the Terminal Zoom Before Playing
Zoom in or out in the terminal until the game is a comfortable size to play.
After changing the zoom, quit and restart ./pong for the new size to take effect.
Simulating Physics
The general way we simulate physics is by first writing down the state that we wish to represent. In this case, we probably need to store:
The position of the ball
The velocity of the ball
The position of the player paddle
The position of the enemy paddle
So these are the relevant parts of the state we care about.
The next thing we need is to compute what happens in the next time step. Computers are discrete machines after all (and the universe might be as well, IDK), so what we can do is try to basically say…
Well, if I know that at the current time step the ball is at this position and has this velocity, we’ll try moving the ball along its direction, then check and see if it has collided with either paddle or the side walls, or has fallen out of the map.
Depending on which case applies, we might need to update the scores or the velocity of the ball.
Note
For those of you doing this in AY26/27, the topics have been shifted by a week so we’re adjusting the writeup a little for you guys. But if you already know what structs are, you can see the state being stored in pong.h. Here’s the snippet here:
typedef struct PairDouble { double x; double y;} PairDouble;typedef struct PongState { unsigned int field_height; unsigned int field_width; double bar_radius; PairDouble ball_pos; PairDouble ball_vec; PairDouble player_pos; PairDouble enemy_pos; unsigned int player_score; unsigned int enemy_score;} PongState;
We’ve modified the code so that you don’t need to know what structs are. But you only have to add code and not modify anything we’ve given you.
Your Tasks and Physics Rules:
Again, being thrown the task of “hey just implement this game” is probably daunting and insane. Especially if all you’ve seen so far is:
After all, how are you gonna go from that tiny little snippet to a full-blown game? (Admittedly with potato graphics…)
Well, here’s the best part about functions (we’ve probably alluded to this a little bit in the lecture by now). We don’t have to tackle the entire problem in its entirety all at once. Heck, in fact, we REALLY shouldn’t. We should break the task down into smaller components, then tackle each component individually. It turns out that this is actually a skill.
Side Note
A good skill to have when implementing a task is to know how to break it down into smaller tasks when needed. In essence:
Should I break this down into smaller tasks? And if yes, what should the tasks look like? How do they help me accomplish my main task?
More on this in the subsequent weeks. But it’s something that I’d like to “foreshadow” now anyway.
For this particular volume, it’s going to be a collaborative effort between you and me. In particular, we won’t need you to decompose the entire game itself; we’ve already done that for you. If you open up student.c and look all the way at the bottom, you’ll see in the tick() function all the relevant sub-tasks that we’ve lined up.
We’ve done up the display and the input processing. What you need to do is fill out the individual aspects of the physics. You might even want to see how we’ve decomposed the entire problem into smaller ones! Then you might notice that your job is a little simpler: For each function, as long as it does its job, the whole program should magically now run.
Side Note
These are some of the key motivations behind the abstracting behaviour and data.
Multiple people can now collaborate on a codebase, as long as everyone writes their part properly and it’s all glued together properly, it just works.
Breaking down the code into smaller tasks makes it far more manageable and readable.
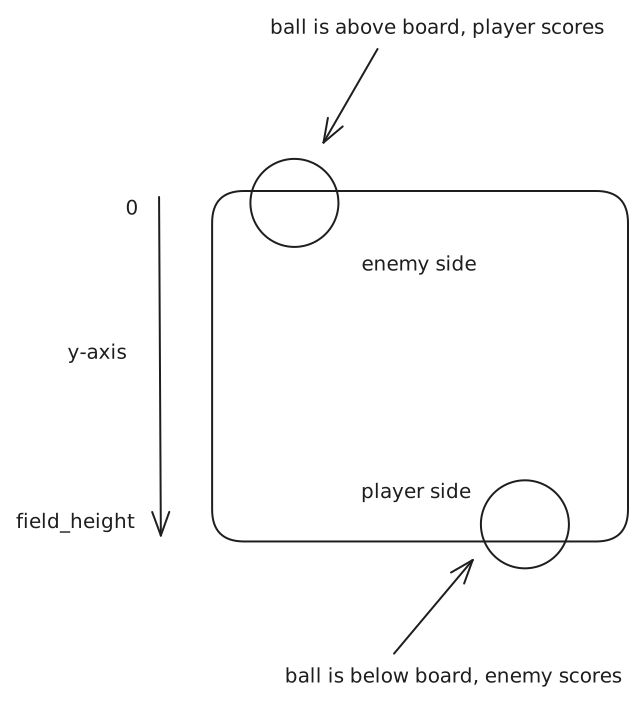
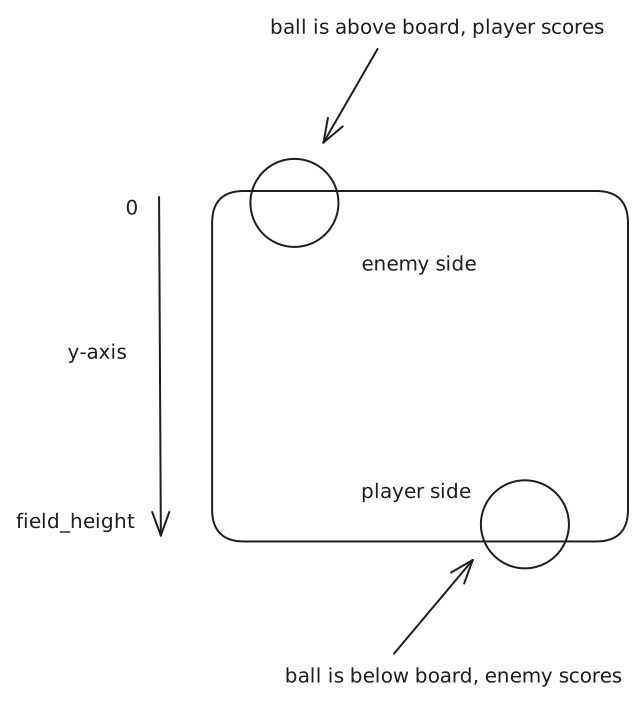
One more important note: we’ve set up the grid so that the x-axis still moves from left to right. I.e. smaller values of x are on the left. However, the y-axis moves from top to bottom. That is to say, smaller values of y are above, and larger values of y are on the bottom. (Over time, you’ll see why this is preferred. For now, just something to get used to.)
Warmup 1: Checking for Winners
Usually games need to end and show an end-of-game screen at some point. Let’s use this to get you warmed up on the “codebase”.
Your Task:
For this game, we will want it to end the moment either player hits a score of 5.
In the function bool has_winner(PongState pstate) in student.c, variables player_score and enemy_score have been initialised for you. Using those variables, implement the behaviour of the function such that it returns true when either player reaches a score of 5.
Warmup 2: Moving the Player Paddle
It wouldn’t be much of a game if the player wasn’t allowed to control anything.
For this game, we will want to implement player movement by allowing them to manipulate their paddle.
The paddle’s left/right position is specified by player_pos_x, and the width of the player paddle is specified by bar_radius. In order to move left, we can simply reduce the value of player_pos_x by 1.0.
We must also check whether the leftmost point of the paddle (i.e. player_pos_x - bar_radius) is at least 0.0. If it’s less than 0.0, then we’re going to “clamp” the position of the paddle by setting the centre of the paddle back to bar_radius.
Similarly, to move a player paddle to the right, we can simply add 1.0 to player_pos_x. We must also check whether the rightmost point of the paddle player_pos_x + bar_radius exceeds field_width or not. If it does, we need to clamp it back down to field_width - bar_radius.
Clamping in both cases ensures that the bar does not run off the playing field.
Advice
Draw out some pictures on a piece of paper if you need help visualising this. It’s a very good skill for programmers to have: using whiteboards to understand problems. Google as a company used to love “whiteboarding” with their interviewees to show their thought processes and approaches to problem solving.
Your Task:
In student.c, the variables bar_radius and player_pos_x
have been initialised for you in both move_left and move_right.
The move_right function also provides field_width for clamping against the right wall.
Using those variables, implement the player movement specified above.
Physics Rule 1: Ball Movement
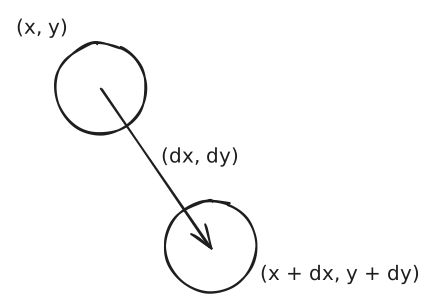
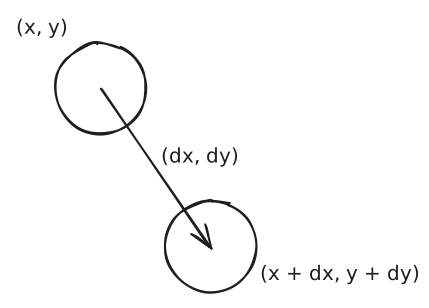
Let’s start with something simple: moving the ball based on its velocity. Let’s say that we stored the velocity of the ball as a vector (dx,dy) where dx is how many units it will travel in the x direction in a single time-tick, and dy is how many units it will travel in the y direction in a single time-tick. Let’s say we also stored the position of the ball as another vector (x,y).
Then we’d update the ball position for a single time-tick like so:
(x+dx,y+dy)
Assuming the ball doesn’t collide with anything, only the position has to be updated, not the velocity.
The Code and Your Task:
Open up student.c and look at the function PongState move_ball(PongState pstate). In it, you will help us implement the logic for straight-line ball movement.
We’ve declared these variables for you, their names should be self-descriptive. Based on these, update the variables ball_pos_x and ball_pos_y to what they should be, based on the formula we’ve given you in the previous sub-section.
Hint: it shouldn’t be too complicated, we did break the game up into very small tasks, so don’t panic. And ask your TA if you need help.
Handling Collisions:
After this point, we’re going to think about collisions. So think about how, after moving a ball in a straight line, we need to see if it is somehow “occupying the same space” as a wall or a player paddle, or is about to fall off the map past a paddle. The subsequent 4 rules we’re covering here will show you how to handle that.
Physics Rule 2: Ball Collision Against Wall
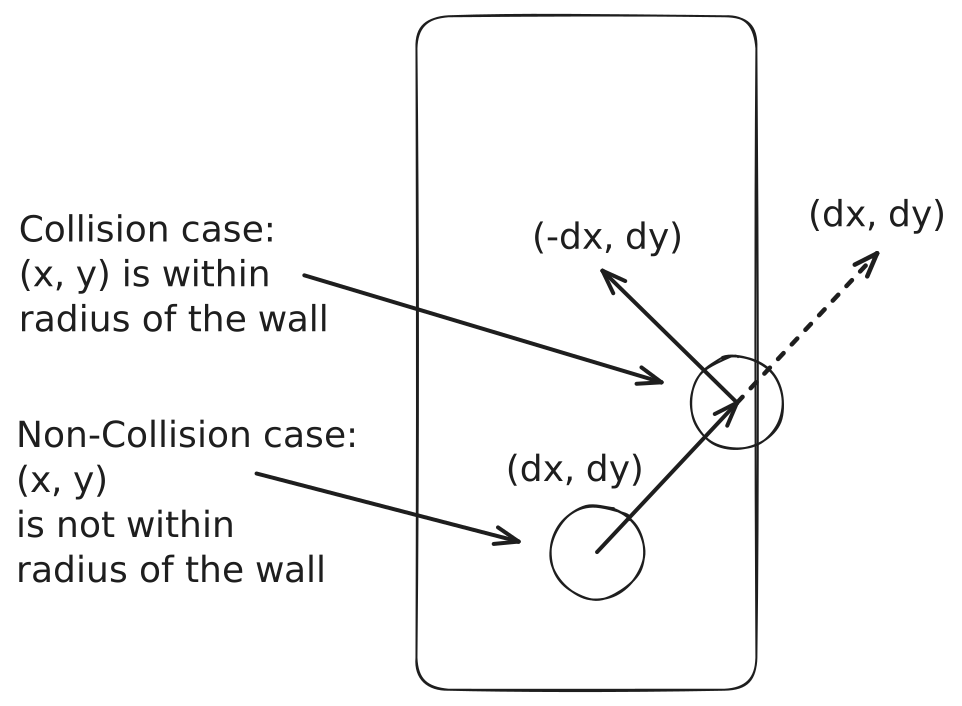
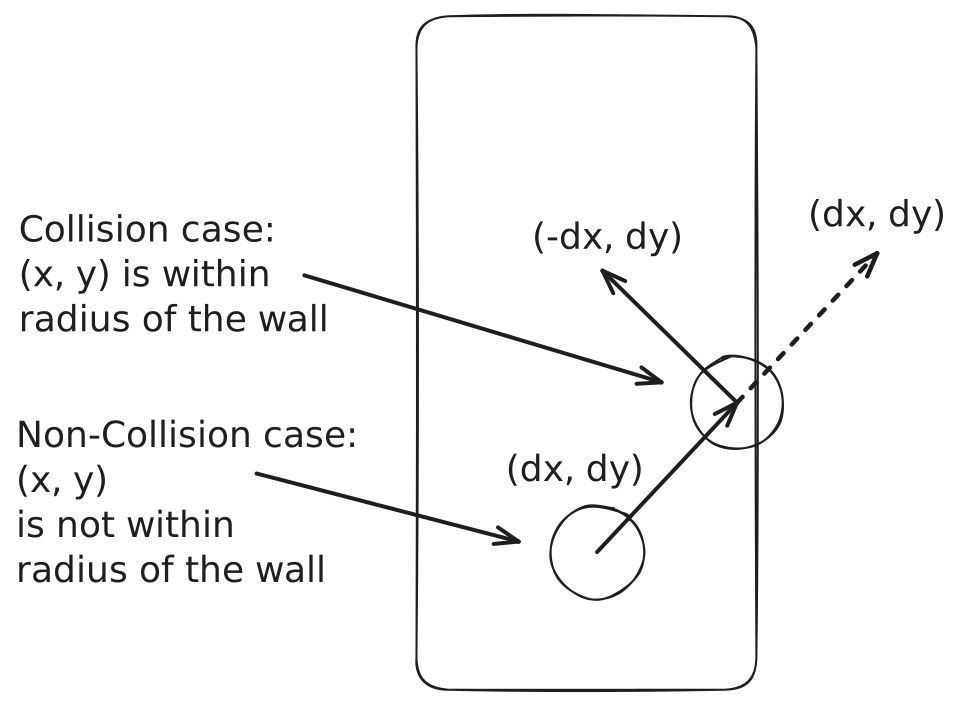
For a wall bounce, we’ll check if the ball is currently “inside” a side wall. If it happens to be within a wall, we just need to flip the direction of the horizontal component of the velocity.
Basically, if the ball’s x position is within 1.0 of either the left wall,
or the right wall (i.e. field_width), and the ball is moving towards that wall,
negate the ball’s x velocity.
Otherwise, leave it unchanged.
In other words, the ball should only bounce off the left wall when ball_vec_x < 0.0,
and only bounce off the right wall when ball_vec_x > 0.0.
The Code and Your Task:
Open up student.c and look at the function PongState collide_ball_against_side_wall(PongState pstate). In it, you will help us implement the logic for straight-line ball movement.
We’ve declared these variables for you, their names should be self-descriptive. Based on these, update the variable ball_vec_x to what it should be, based on the formula we’ve given you in the previous sub-section.
Physics Rule 3, 4: Ball Collision Against Either Player Paddle
The next thing we need to do is implement the ball bounce against the player paddle. The same description applies to the enemy paddle.
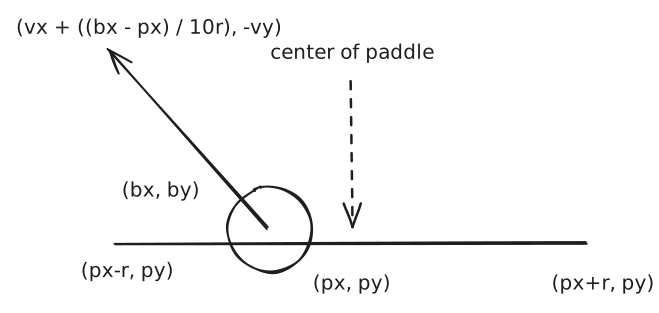
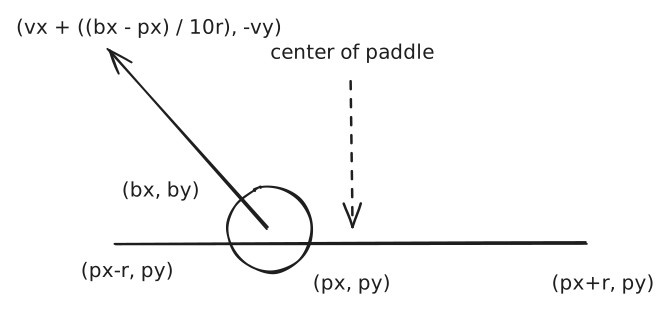
The way that classic Pong imparts direction into the ball is based on how far the ball is from the centre. It is summarised in a diagram:
Letting (px,py) be the centre position of the paddle,
r be its radius (not its diameter),
(bx,by) be the centre position of the ball, and
(vx,vy) be the x and y components of its velocity,
we’ll use a simple rule (which is likely not “realistic”).
Calculate the steering offset (bx−px)/10r.
At the left end of the paddle this produces −0.1,
at the centre it produces 0,
and at the right end it produces +0.1
Add that steering offset to the ball’s current x-component of velocity
Reverse the y-component of the ball’s velocity
No, energy is 10000% not conserved in this system, but that’s fine. It’s a tongue-in-cheek game to begin with.
The Code and Your Task:
Open up student.c and look at the function PongState collide_ball_against_player(PongState pstate). In it, you will help us implement the logic for collision against the player paddle.
Check whether the ball is no more than 1.0above the paddle and has not passed through it
Check whether the ball’s x-coordinate is within r of the paddle’s x-coordinate
Check whether the ball is moving towards the player paddle,
meaning ball_vec_y > 0.0
If all three conditions hold true, apply the changes mentioned above
Important Note
To compare between floating-point values a and b to see if they are within a certain difference d, use the function fabs(). This happens to compute the absolute value of floating-point values (run man 3 fabs to know more about this fabulous function).
In particular, you will find fabs(a - b) <= d to be a great pattern.
Similarly, looking at the function PongState collide_ball_against_enemy(PongState pstate), you’ll have to implement very similar logic:
Check whether the ball is no more than 1.0below the paddle and has not passed through it
Check whether the ball’s x-coordinate is within r of the paddle’s x-coordinate
Check whether the ball is moving towards the enemy paddle,
meaning ball_vec_y < 0.0
If all three conditions hold true, apply the changes mentioned above
Across both types of paddles, you should only ever have to alter ball_vec_x and ball_vec_y.
Physics Rule 5: Ball Passing The Paddle
Next, we need to update the game state when the ball has otherwise run off the board. In particular, we’ll need to reset the ball position back into the center and update the player scores depending on which side it has fallen off.
If the ball’s y-coordinate is at most 1.0, then increase the player score. Otherwise, if the ball’s y-coordinate is at least field_height - 1.0, then increase the enemy’s score. The relevant variables should already be initialised in the code for you and are hopefully self-explanatory.
If either case applies, the supplied reset logic will also:
Set the ball’s position back to (field_width / 2.0, field_height / 2.0)
Set the ball’s velocity to (0.0, +0.1)
Set both paddles’ horizontal positions to field_width / 2.0
The Code and Your Task:
Open up student.c and look at the function PongState score_check(PongState pstate). In it, you will help us implement the logic for updating player scores.
The supplied function PongState reset_ball(PongState pstate) performs these resets for you.
Summary of Functions to Implement
Implement these functions in student.c:
has_winner: check whether either player has won
move_left: move the player paddle left without crossing the side wall
move_right: move the player paddle right without crossing the side wall
move_ball: update the ball position using its velocity
collide_ball_against_player: handle collisions with the player paddle
collide_ball_against_enemy: handle collisions with the enemy paddle
collide_ball_against_side_wall: handle collisions with either side wall
score_check: update the scores when the ball leaves the playing field
Testing Your Implementation
Run the supplied tests from the 6-pong directory with:
make test
To run only the cases for one function, set FUNCTION to its exact name:
make test FUNCTION=collide_ball_against_player
The runner compares FUNCTION with the first line of each .in file.
If FUNCTION is omitted, make test runs every supplied test case as usual.
The tests call the individual functions in student.c directly,
so they do not need to open the graphical game or read keyboard input.
The supplied cases cover winning scores, paddle movement and clamping,
ball movement, wall and paddle collisions, score updates, and resetting the ball.
As usual, grading also includes private test cases that are not supplied to you. The test case format, should you choose to make your own tests, or understand them, is given below in the appendix.
Bonus: (Ungraded)
If you wish to try implementing your own game AI, pop open ai.c and see if you want to implement your own algorithm. We’ve left documentation in the form of comments at the top of the file.
This is really for your own exploration only and is not mandatory in any way! Since we did painstakingly build a whole “game engine” after all, this can be a playtest area for you if you want to have fun. :)
Test Case Format
Each test case is stored as a matching .in and .out pair in test/test_cases.
The first line of an input file selects the function to test,
and the second line supplies the relevant fields of the game state.
For example:
collide_ball_against_player5 50 90 50 89 0.25 0.1
The matching expected output is:
0.250000 -0.100000
This example gives the player paddle a radius of 5, places its centre at (50, 90),
and places the ball at (50, 89) with velocity (0.25, 0.1).
The ball is within range and moving towards the player paddle,
so its vertical velocity is reversed.
Note
Positions, velocities, and bar_radius are floating-point and appear with
six decimal places in output. field_height, field_width, player_score,
and enemy_score are whole numbers.
Format Reference
has_winner
has_winnerplayer_score enemy_score
Output: true or false.
move_left / move_right
move_leftfield_width bar_radius player_pos_x
Replace move_left with move_right to test the other direction.
Output: the updated player_pos_x.
You are encouraged to add your own .in/.out pairs to test/test_cases,
especially for boundary conditions not covered by the supplied cases.
The test runner will pick them up automatically.