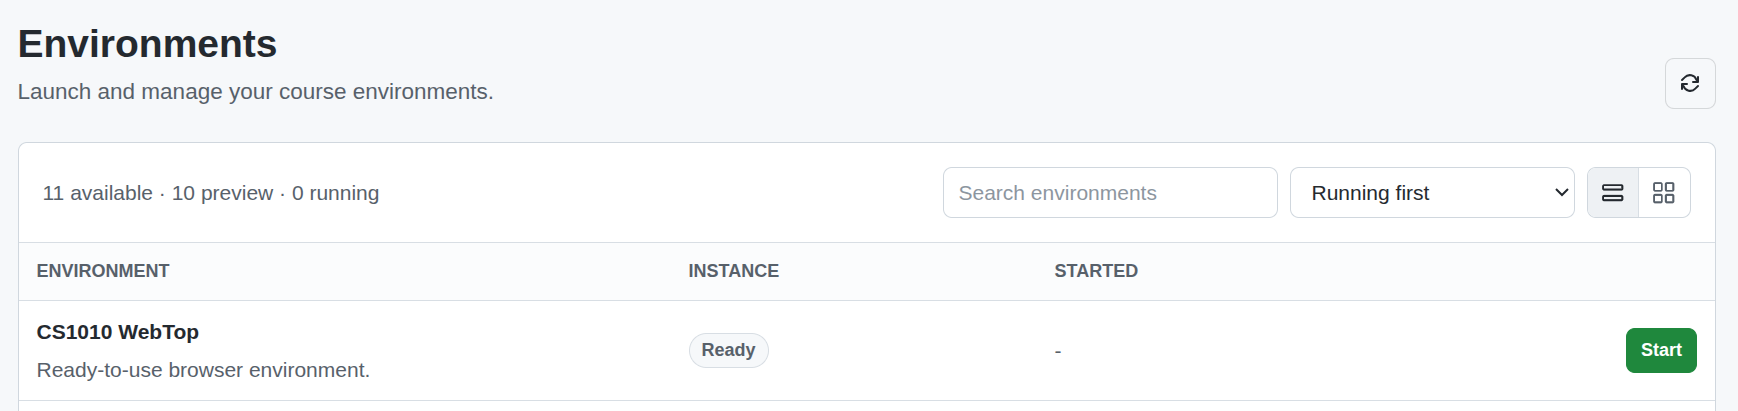
Now, start a CS1010 WebTop (“web-based desktop”) environment by clicking the “Start” button in the interface shown.
After that, wait for your WebTop instance to start. It’ll take at least 10 seconds, potentially up to a couple minutes.
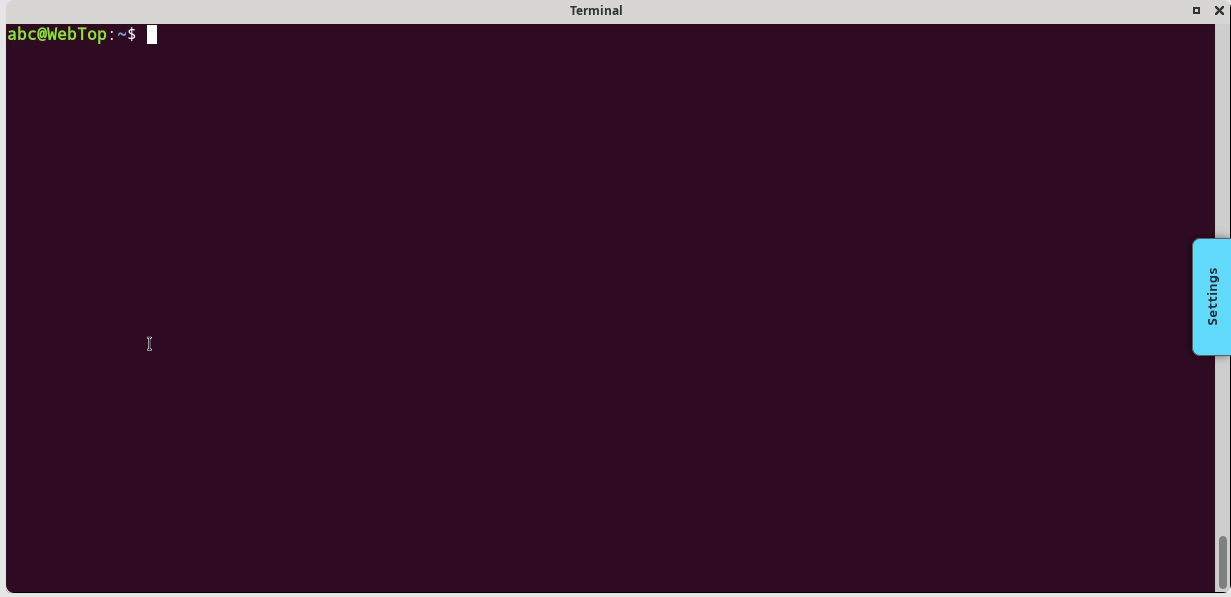
Once it’s running, click “Enter”. You should now have a WebTop interface in your browser that looks something like this:
Background: The Terminal and the Shell
What you see in front of you is a terminal,
which provides a text-based interface
(or “command line interface” (CLI))
for interacting with your operating system.
This might seem pretty alien to you:
where’s the nice desktop with icons that I can click?
Historically, all systems started like this!
(before mice and color displays became popular)
More background here.
Despite how old they are, terminals are commonly used in programming and system administration as opposed to graphical user interfaces (GUIs) that you might be more familiar with (like the Windows or macOS desktop),
because they allow for faster, more efficient, and more powerful control over the system.
Furthermore, if you access a remote system
(that is, a computer that is not physically in front of you, such as a server, which is common in your fields),
often, you can only do so via a terminal interface.
Text Sizing
If the terminal box is too small, you can click the box icon in the top right to maximize it.
If the text is too small, you can press Ctrl Shift + (hold the control and shift keys and press the plus key) to increase the font size, and Ctrl - to decrease it.
Mac users may have to use Command instead of Ctrl.
Copying and Pasting in the Terminal
To copy text from the terminal, select it with the mouse, then press Ctrl-Shift-C.
To paste text into the terminal, press Ctrl-Shift-V.
The Shift key matters because Ctrl-C interrupts a running command.
Let’s first try to understand what we’re seeing.
The small white rectangle is the cursor where the things you type will be output to.
The text before the cursor is composed of a few things:
Your username (in this case, your username is abc), followed by an @ symbol
The “hostname” of the computer (in WebTop, this is webtop)
The current directory (i.e., folder) that you are in (in this case, ~, the tilde symbol, which is a short form that refers to your home directory)
The $ symbol, which typically indicates that everything after it is a shell command
The shell (called bash or the “Bourne Again Shell” in our case) is the default program that runs when you open this terminal. The bash program provides the interface we just described.
Running Commands
That was a lot of exposition.
We said the shell is very powerful, etc, but it seems pretty lame at the moment.
How can we do stuff using the shell?
Type (only) the word date and press the ENTER key.
Wait a second or two, press the UP arrow key, then press ENTER again.
Great! You should have seen the current date and time printed out on the terminal, twice.
We just ran the date program, which has the sole purpose of printing out the current date and time.
You can run any program similarly: just type its name and press ENTER.
Pressing the UP arrow key repeatedly recalls the last few commands that you typed, which helps in that efficiency thing we were talking about.
How do we know what programs do what?
Well, that’s the wizardry part of the terminal: if you know the incantations (or have access to Google…), you can do what you want!
Type the following commands one by one, and observe the output:
whoami - This program prints your username
hostname: This program prints the hostname of the computer you’re using. In WebTop, it should print webtop, which is also the hostname shown in the prompt.
clear: This program clears the terminal screen
(Note: pressing the key combination Ctrl-L does the same thing)
sleep 5: This is the sleep program with an argument of 5 (think of it like a “setting”)
This program waits for 5 seconds before exiting
echo "hello!": This program with argument “hello” prints the text inside the quotes to the terminal
The terminal also accepts control sequences: special key combinations that perform specific actions.
Try the following control sequences (e.g., Ctrl-X means hold Ctrl and press X):
Ctrl-C: This command interrupts the current command or program running in the terminal
Try it while sleep 5 is running.
This is a very common control sequence
Ctrl-L: This command clears the terminal screen (same as the clear command)
Ctrl-U: This command deletes the entire line of text before the cursor (useful if you want to clear the current command you’re typing)
Warning
You probably don’t want to use these (or you might use them accidentally)
Ctrl-Z: This command suspends the current process and puts it in the background
You might type this by mistake and think you killed the program, but haven’t.
Run the command fg to continue running the program you suspended
Ctrl-S: you might press this by mistake, which freezes the terminal output
To unfreeze it, press Ctrl-Q
Directory Structure
The terminal is not just a way to run programs, but also a way to navigate and manipulate files and directories.
You will spend lots of time doing this!
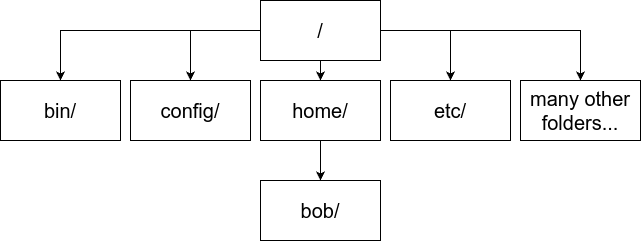
The file system in Linux is organised in a “tree”-like structure, with directories containing files and other directories.
The / symbol refers to the root directory of your system, and all the system’s files and directories are somewhere under that root directory.
The most important directory to you is your home directory, where you can create files and directories, and it’s where your shell program starts you from.
Typically, the home directory of a user is a subdirectory of the home directory, which is itself a subdirectory of /.
For instance, the home directory of a user named john would typically be at /home/john.
This format of describing a “place” (path) in your file system is called an absolute path, i.e., a path that starts with /.
This is compared to a relative path, which is a path that is relative to the current directory you are in.
For example, if you are in the /home/john directory, the relative path to the /home/john/documents/nus/ directory would just be documents/nus/.
You can choose either form when specifying a directory or file.
However, for reasons we won’t go into, in WebTop, your home directory is /config.
We mentioned earlier that ~ is a shell shortcut to your home directory.
However, we can “expand” it to the full name of the home directory, and also prove in another way that /config is your home directory:
Type the following commands one by one, and observe the output:
echo ~: echo followed by the tilde symbol, where echo is a program that prints text to the terminal
pwd: the program that prints the current working directory, i.e., the directory you are currently “in” when executing your shell commands
Now that you know how to find your home directory, let’s learn how to move around the file system.
Navigating the File System
Let’s start by trying to change our current working directory and listing files inside directories.
The most important commands for this are cd (short for “change directory”), ls (short for “list”), and pwd (short for “print working directory”).
These commands are used to navigate the file system and view its contents.
Type the following commands one by one, and observe the output:
cd /: changes the current directory to the root directory of the file system
pwd: prints the current working directory, which should now be /
ls: This program lists the contents of the current directory
You should see a list of directories and files in the root directory.
You can explicitly list the content of any directory by specifying its absolute path, e.g., ls /, even if you are not in that directory.
You can also use ls -l to see a vertical list with more details, and ls -a to see hidden files and directories (whose names start with a dot)
cd bin: changes the current directory to the bin directory using a relative path; note that we didn’t specify the / symbol before bin, because we are already in the root directory where bin is a subdirectory
cd ~: goes back to your home directory
Command
Description
cd /
Change to the root directory
cd ~
Change to your home directory (i.e., /config)
cd
a faster way to change to your home directory (same as cd ~)
cd ..
Move up one directory level (to the parent directory)
cd -
Switch to the previous directory you were in
Manipulating Files and Directories
Now that you know how to navigate the file system, let’s learn how to create and delete files and directories.
The most common commands for this are mkdir (short for “make directory”), rmdir (short for “remove directory”), rm (short for “remove”), touch, cp (short for “copy”), and mv (short for “move”).
Type the following commands one by one, and observe the output:
mkdir test: creates a new directory called test in the current directory
You can also create directories and subdirectories in one command by specifying the full path, e.g., mkdir -p test/subdir/anotherdir, where the -p option allows you to create parent directories as needed
cd test: changes the current directory to the newly created test directory
touch file.txt: This command creates an empty file called file.txt in the current directory
mv file.txt file2.txt: renames the file file.txt to file2.txt
If you want to move a file to another directory, you can specify the path. For example, mv file2.txt /config/ moves the file to your home directory
Move it back before continuing by running mv /config/file2.txt .
cp file2.txt file.txt: copies the file file2.txt to a new file called file.txt in the current directory
You can also use cp -r src/ dest/ to copy a directory src/ and all of its contents to dest/ recursively
ls: lists the contents of the current directory, which should now include file.txt and file2.txt
rm file.txt file2.txt: removes the file.txt and file2.txt files
Be careful with this command, as it does not ask for confirmation before deleting files!
You could also have used rm *.txt to remove all files with the .txt extension in the current directory (the * is a wildcard that matches any characters)
cd ..: moves you back to the parent directory (in this case, back to your home directory)
rmdir test: This command removes the empty test directory
It won’t work if the directory is not completely empty
Getting Help: man (Manual) Pages
The commands we introduced (and will introduce) can be used in many ways and have many options.
It’s hard to remember them all.
A critical part of this course will be to read man or “manual” pages present in Linux, which document the usage of various commands and functions.
To use man, simply type man <command>.
For example, type man ls to see the manual page for the ls command.
Use the following keys to navigate the manual page:
Press the Up and Down arrow keys (or the keys j and k) to scroll line by line
Press the Space key to scroll down one page at a time
Press the q key to quit the manual page and return to the terminal
Try to answer the following (more advanced usage) questions using man pages for your existing commands:
How can I remove a directory and all its subdirectories, even if there are files inside?
How do I list files in a directory, sorted by when they were last modified?
Compare man printf with man 3 printf
What does the number argument after man do?
You may want to check man man-pages
Creating File Content
We now can create directories, and (empty) files.
However, we now want to create files that have actual content (e.g., text files, code files), otherwise this seems quite pointless!
You should be pretty used to editing files in a graphical editor, for instance Google Docs, Microsoft Word, etc.
However, in a terminal environment, we don’t have such graphical editors.
Instead, we use terminal-based text editors to create and edit files.
There are many such editors available in Linux, but two common options are the programs nano and vim.
Using nano to Create and Edit Files
nano is a relatively simple terminal-based text editor, while still being powerful enough for most tasks.
You can immediately start editing files with it, and any “special actions” can be done with Ctrl or Alt key combinations.
For example, to save a file, you press Ctrl-O (the letter O), and to exit the editor, you press Ctrl-X.
Follow these steps to create and edit a file using nano:
Type the command nano test.txt in the terminal and press ENTER
This will open the nano text editor
You should see a blank screen with a cursor
Type some text, e.g., “Hello, CS1010!”
Press Meta-U to undo and Meta-E to redo. Meta is usually the Alt key; if that does not work, press and release Esc before pressing U or E
You can copy the current line or selected text with Meta-6 (usually Alt-6), cut a line of text with Ctrl-K, and paste it with Ctrl-U
To save the file, press Ctrl-O (the letter O), then press ENTER to confirm
Note that test.txt won’t be created until you do this step
To exit nano, press Ctrl-X
You’ll see helpful instructions at the bottom of the nano editor, which tell you what key combinations do what.
You can also use the mouse to move the cursor around, and select sections of text via clicking at the start and end of the region.
We won’t go into more details about nano here, but you can read the manual page, online documentation, or press Ctrl-G to see the help menu while in nano.
Using vim to Create and Edit Files
vim is a powerful terminal-based text editor, but it has a steeper learning curve, and many students find it difficult to use at first.
The most alien part of it is that it’s a modal text editor, with two main modes: normal mode (for navigating and manipulating text) and insert mode (for editing text).
You can switch between these modes using the i key (this is just one way) to enter insert mode, and the Esc key to return to normal mode.
In the future, we will look more deeply into Vim.
In the meantime, a short exercise on doing the same things as nano above, but in vim:
Follow these steps to create and edit a file using vim:
Type the command vim test2.txt in the terminal and press ENTER
This will open the vim text editor
You should see a blank screen with a cursor
Press the i key to enter insert mode, and type some text, e.g., “Hello, CS1010!”
Press the Esc key to return to normal mode
Press u to undo the last change, and Ctrl-R to redo it
To save the file, type :w and press ENTER
This will write the changes to the file
To exit vim, type :q and press ENTER
If you want to save and exit at the same time, type :wq instead
We will have a dedicated tutorial for vim next week, but until then, you can look at other vim tutorials online.
Choosing an Editor for CS1010
Both nano and vim will be supported in CS1010, but if you don’t have a preference, we recommend starting with nano as it is simpler to use for a start.
vim is more powerful and has many features, but it has a steeper learning curve.
If you feel that vim is limiting your ability to do programming, we recommend nano
You can always switch to vim later if you want to learn it.
What’s most important is: choose one and practise with it!
Your First Program
Follow these steps to write, build and run your first C program:
You should now see a file a.out. Run it with ./a.out
Why ./?
The ./ means “in this directory”.
Without it, the shell only looks in a fixed list of system locations,
and your program is not in any of them.
Try running a.out on its own and see what it says.
If you want to give the output file a name, use the -o flag:
clang hello.c -o hello./hello
Warning
Be extra cautious when using tab completion on the command line.
When compiling a C file for the first time,
it’s easy to accidentally run something like clang hello.c -o hello.c (note how the input and output file are the same),
where the output file overwrites your source.
Unless you have a backup, your code will be lost.
How Exercise Volumes Work
Almost every week, if not every week, there will be programming assignments,
called volumes,
that will have to be submitted.
In this section,
we will go through the entire workflow on a sample volume.
Helper Program cs1010
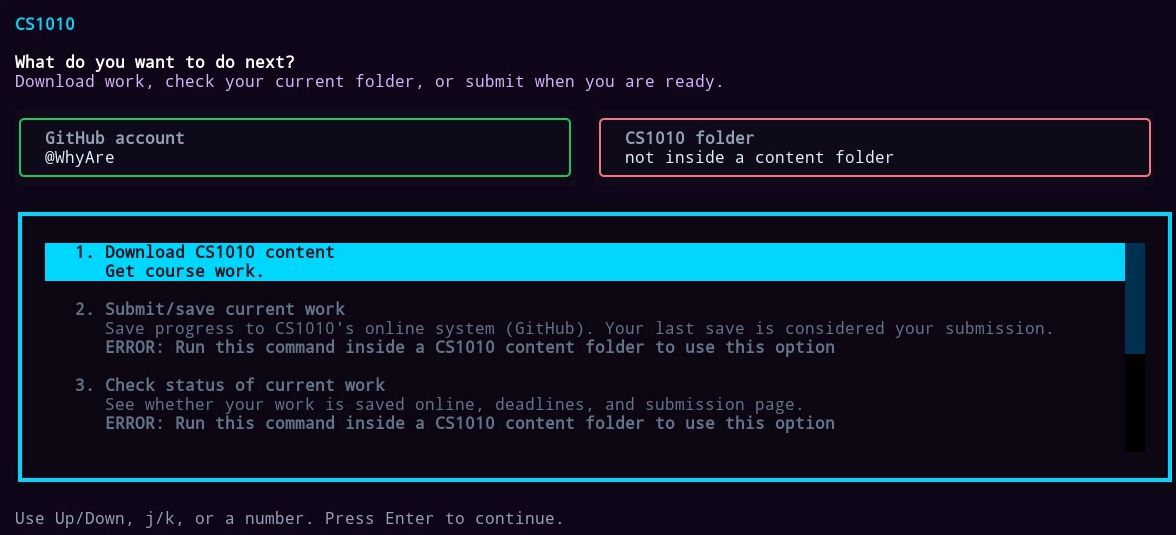
In this course, we have a helper program called cs1010.
Start the program by typing cs1010, you should see the app open.
In the top left corner, ensure that it shows your GitHub username,
and not someone else’s 🤔.
Behind the scenes
All of the code for the course is stored on GitHub, and your code will also be stored on GitHub when you submit it. Submitting is more like “saving” your progress to GitHub. Finally, your TAs will give comments on your submitted code on GitHub as well.
Downloading the Volume
Download the sample volume with the cs1010 helper:
Select Download CS1010 content
Select Volumes
Select Sample Volume (Ungraded)
Enter the exercise directory, replacing <github-username> with your GitHub username. The cs1010 user interface will also tell you where your folder is downloaded to.
cd ~/volume-sample-<github-username>/hello-world
Walkthrough of the Directory Layout
Every volume will have exercises,
and each exercise will be in its own directory,
and each exercise directory will look like this:
test/test_cases: Stores the test cases for the program.
An .out file holds the output the program is expected to produce,
and in later exercises there will also be .in files representing the input given to the program.
This exercise takes no input, so it only has 1.out, which contains Hello W
student.c: (Usually) the file to fill up, unless stated otherwise
Makefile: Don’t worry about this, it will always be there
Your Task
student.c contains a main function with a TODO in it:
int main(void) { char a = 'W'; /* TODO: Print "Hello ", then the value of a, followed by a newline. */ return 0;}
Open student.c and replace the TODO with one call to printf,
so that the program prints Hello , then the value of a, followed by a newline.
Since a is 'W', the program should print Hello W.
(SPOILER: try it first!) I have no idea how to do that
printf("Hello %c\n", a);
Building Your Assignment
Compile your code by running:
make
Unlike what we described previously,
you usually will not be using clang to compile your code for most exercises
make calls clang for you.
This is because there are a lot of “flags” (options) that are helpful during compilation,
and sometimes you compile more than one file, and the command can get complicated.
For the curious, you can try opening the Makefile file to see inside.
We will always tell you what the compiled program (the executable) will be named.
In this volume, the output file is called hello.
If we forget to mention the executable's name... (oops!)
If for some reason we don’t tell you the output file,
you can run ls and find the file in green. A green-colored file in our terminal environment means that it is executable (it can be run by the operating system)
Run the program:
./hello
What it prints should match the contents of test/test_cases/1.out.
Testing Your Assignment
Running the program and eyeballing the output works for one test case,
but it gets tedious quickly.
make test builds your code and checks it against every test case for you.
Run make test to compile and test your code.
For assignments,
we may have public tests which you can run yourself and view the output for,
and there may also be private tests,
which we will run separately after your submission.
Therefore, do not assume that your code is 100% correct,
even though it passes all the public testcases.
Submitting Your Assignment
Submit your work:
Run cs1010 from anywhere inside the ~/volume-sample-<github-username> folder
Choose Submit/save current work
Choose Continue and submit this content
The helper saves your latest changes to a private “repository” on GitHub that CS1010 has provisioned for you. After submission, the cs1010 command will display a link to the GitHub
page for your work. This is where your teaching assistants will leave comments on your code after a real volume submission.
Note
This volume is for practice only - it has no deadline and is
never graded, but you should submit it once so you have practised the complete
workflow before a real volume.
After submission, the helper displays a generic message about staff running an
autograder after the deadline / reviewing your work on GitHub. That message does not apply to this ungraded
sample volume, and no autograder result will be posted for it.
Congratulations! You should have now completed your first assignment in CS1010 :)
Graded Task(s)
To end off this tutorial, and every one from here on,
there will be task(s) to complete.
Unlike the rest of this tutorial,
these tasks award marks.
Starting the Graded Environment
Go to https://code.cs1010.org,
start a new “Tut 0: CLI Crash Course” environment,
then click “Enter” to open it for this graded task
You may get an error about “Maximum number of environments” like this
This prevents students from opening too many environments at the same time. In this case,
stop the CS1010 WebTop environment from earlier
Do not worry: anything you stored in the CS1010 WebTop environment will persist the next
time you start it.
Stopping Tutorial Environments Resets Them
Unlike WebTops, stopping a tutorial environment resets its contents to the default state.
If you have already submitted a tutorial, your submission remains recorded.
Task 1
Meet Bob
Bob (short for Robert) is a classmate taking CS1010 with you.
You didn’t really choose to befriend Bob, but you’re stuck with him for the rest of these tutorials.
He’s generally clueless, so you’ll be helping him throughout the course, hopefully deepening your own understanding along the way.
Bob finished this tutorial’s walkthrough and decided he’s gifted in programming.
To get ahead, he dug up last year’s material and started on the exercise there,
which looked close enough to the one he just did.
It isn’t quite the same.
Last year’s task has no variable in it at all:
it just has to print “Hello World” followed by a newline.
Bob has been stuck on this for an hour.
The only printf he has ever seen is printf("Hello %c\n", a),
so if there is no variable to print, what is he supposed to put as the second argument?
Help him.
Heads up
No downloading this time, the files are already in your container at ~/tutorial-graded/task1. This will usually be the case for tutorials.
Since this is Bob’s assignment, there’s nothing for you to submit. We will mark it as complete once the tests pass.
Go to ~/tutorial-graded/task1
Fill in the main function in student.c to print “Hello World”
Run the command that tests your code against the public test cases
This graded task is complete once you see this message:
Task 2
Bob sends you a secret message.
It comes as a program called secret.
Run it to reveal the message.
The catch: secret only works from a directory called ~/this/that.
Note
Typically, you should never run a stranger’s program.
Bob isn’t a stranger.
Bob is a friend you didn’t ask for.
Go to ~/tutorial-graded/task2
Movesecret into ~/this/that
(you may need to create the directory if it doesn’t exist)
From there, run ./secret
Warning
Move (don’t copy) or you won’t get the secret message.
You should see a similar message to Task 1 if you succeeded.
You don’t have to do anything else if you’ve observed the messages for the task - you’re done with the graded tutorial!
Want to restart?
It’s quite easy to get confused here and want to restart this task. If you really need to reset, “Stop” this tutorial instance from the https://code.cs1010.org homepage. This will reset the whole Tutorial 0 environment, but if you already submitted Task 1, it will remain submitted. This is the same for all tutorials.